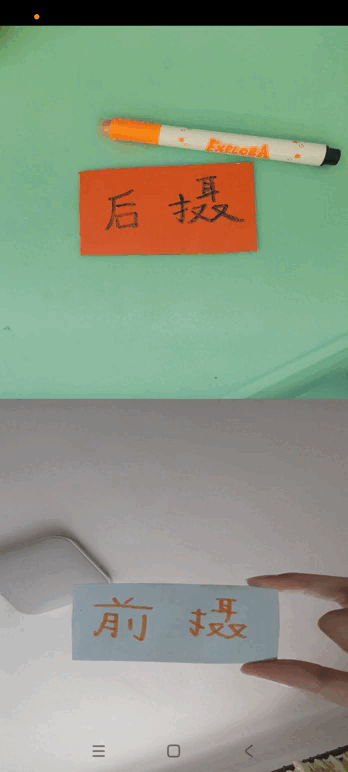
效果展示
一.概述
本博文讲解如何实现手机前后两颗摄像头同时预览并显示
我之前博文《OpenGLES:GLSurfaceView实现Android Camera预览》对单颗摄像头预览做过详细讲解,而前后双摄实现原理其实也并不复杂,粗糙点说就是把单摄像头预览流程写两遍。
与之前博文中使用GLSurfaceView实现相机预览不同,这次前后双摄使用TextureView来完成
二.变量定义
2.1 公共变量
//权限
public static final int REQUEST_CAMERA_PERMISSION = 1;

private String mCameraId;
private Size mPreviewSize;
public final int mMaxImages = 5;

//相机状态信号量
private Semaphore mCameraOpenCloseLock = new Semaphore(1);
2.2 摄像头相关变量
...

private TextureView mFrontTextureView;
private CameraCaptureSession mFrontCaptureSession;

private TextureView mBackTextureView;
private CameraCaptureSession mBackCaptureSession;

...
两个CaptureSession、两个TextureView(也就是同时两个Surface)
三.OpenCamera()
在 onResume() 中先判断 TextureView 状态是否 Available()
- 如果是就 OpenCamera()
- 如果不是就设置 SurfaceTexture 监听,在 onSurfaceTextureAvailable() 监听回调中再OpenCamera()
onResume()代码:
@Override
public void onResume() {
	super.onResume();

	if (mBackTextureView.isAvailable()) {
		openCamera(true, mBackTextureView.getWidth(), mBackTextureView.getHeight());
	} else {
		mBackTextureView.setSurfaceTextureListener(mBackSurfaceTextureListener);
	}

	if (mFrontTextureView.isAvailable()) {
		openCamera(false, mFrontTextureView.getWidth(), mFrontTextureView.getHeight());
	} else {
		mFrontTextureView.setSurfaceTextureListener(mFrontSurfaceTextureListener);
	}

	startBackgroundThread();
}
OpenCamera()时需要判断当前打开的是哪颗摄像头,然后走各自对应的流程
OpenCamera()代码:
private void openCamera(boolean isBack, int width, int height) {

	...

	if (isBack) {
		mCameraId = manager.getCameraIdList()[0];
        //预览size先写成固定值
		mPreviewSize = new Size(1440, 1080);

		mBackImageReader = ImageReader.newInstance(mPreviewSize.getWidth(), mPreviewSize.getHeight(), ImageFormat.YUV_420_888, mMaxImages);
		mBackImageReader.setOnImageAvailableListener(mOnImageAvailableListenerBack, mBackgroundHandler);

		Log.v(TAG, "openCamera mCameraId=" + mCameraId);
		manager.openCamera(mCameraId, mStateCallBack, mBackgroundHandler);
	} else {
		mCameraId = manager.getCameraIdList()[1];
        //预览size先写成固定值
		mPreviewSize = new Size(1080, 720);

		mFrontImageReader = ImageReader.newInstance(mPreviewSize.getWidth(), mPreviewSize.getHeight(), ImageFormat.YUV_420_888, mMaxImages);
		mFrontImageReader.setOnImageAvailableListener(mOnImageAvailableListenerFront, mFrontgroundHandler);

		Log.v(TAG, "openCamera mCameraId=" + mCameraId);
		manager.openCamera(mCameraId, mStateCallFront, mFrontgroundHandler);
	}

	...

}
四.createCaptureSession()
OpenCamera()之后,分别为前后摄创建CaptureSession
private void createCameraPreviewSession(boolean isBack) {
	try {
		if (isBack) {
			SurfaceTexture texture = mBackTextureView.getSurfaceTexture();
			assert texture != null;
			texture.setDefaultBufferSize(mPreviewSize.getWidth(), mPreviewSize.getHeight());

			ArrayList<Surface> surfaces = new ArrayList<Surface>();
			Surface surface = new Surface(texture);
			surfaces.add(surface);
			surfaces.add(mBackImageReader.getSurface());

			...

			mCameraDeviceBack.createCaptureSession(surfaces, mBackStateCallback, mBackgroundHandler);
		} else {
			SurfaceTexture texture = mFrontTextureView.getSurfaceTexture();
			assert texture != null;
			texture.setDefaultBufferSize(mPreviewSize.getWidth(), mPreviewSize.getHeight());

			ArrayList<Surface> surfaces = new ArrayList<Surface>();
			Surface surface = new Surface(texture);
			surfaces.add(surface);
			surfaces.add(mFrontImageReader.getSurface());

			...

			mCameraDeviceFront.createCaptureSession(surfaces, mFrontStateCallback, mFrontgroundHandler);
		}

	} catch (CameraAccessException e) {
		e.printStackTrace();
	}
}
五.setRepeatingRequest()
createCaptureSession()之后,在前后摄各自的状态回调StatCallback中调用setRepeatingRequest()启动预览。
前摄:
CameraCaptureSession.StateCallback mFrontStateCallback = new CameraCaptureSession.StateCallback() {
	@Override
	public void onConfigured(CameraCaptureSession session) {
		Log.v(TAG, "CameraCaptureSession onConfigured");

        ...

		mFrontCaptureSession = session;
		try {

		    ...

			mFrontCaptureSession.setRepeatingRequest(mFrontPreviewRequest,
					mPreviewBackCallback, mBackgroundHandler);
		} catch (CameraAccessException e) {
			e.printStackTrace();
		}
	}

	@Override
	public void onConfigureFailed(CameraCaptureSession session) {
		Log.v(TAG, "onConfigureFailed");
		showToast("onConfigureFailed");
	}
};
后摄:
CameraCaptureSession.StateCallback mBackStateCallback = new CameraCaptureSession.StateCallback() {

	@Override
	public void onConfigured(CameraCaptureSession session) {
		Log.v(TAG, "CameraCaptureSession onConfigured");

		...

		mBackCaptureSession = session;
		try {

		    ...

			mBackCaptureSession.setRepeatingRequest(mBackPreviewRequest,
					mPreviewFrontCallback, mFrontgroundHandler);
		} catch (CameraAccessException e) {
			e.printStackTrace();
		}
	}

	@Override
	public void onConfigureFailed(CameraCaptureSession session) {
		Log.v(TAG, "onConfigureFailed");
		showToast("onConfigureFailed");
	}
};
六.注意
1.布局优化
本篇博文最开始,展示了两种前后双摄效果
第一种是分屏显示,前后摄预览各占1/2,但是画面有压缩
第二种是重合显示,前后摄预览重合在一起,画面没有压缩,但是有部分区域重叠覆盖
两种不同的显示方式,其实只是两个TextureView在布局文件中不同的配置
(1).第一种是在两个TextureView控件外加了一层LinearLayout控件
<?xml version="1.0" encoding="utf-8"?>
<androidx.constraintlayout.widget.ConstraintLayout xmlns:android="http://schemas.android.com/apk/res/android"
    android:layout_width="match_parent"
    android:layout_height="match_parent"
    android:orientation="vertical">

    <LinearLayout
        android:layout_width="match_parent"
        android:layout_height="match_parent"
        android:orientation="vertical">

        <TextureView
            android:id="@+id/texture_back"
            android:layout_width="match_parent"
            android:layout_height="0dp"
            android:layout_weight="1"/>

        <TextureView
            android:id="@+id/texture_front"
            android:layout_width="match_parent"
            android:layout_height="0dp"
            android:layout_weight="1"/>
    </LinearLayout>

</androidx.constraintlayout.widget.ConstraintLayout>(2).第二种去掉了LinearLayout,且在源生TextureView基础上略微封装了一个自定义的AutoFitTextureView,自动适配传入的显示区域宽高
<?xml version="1.0" encoding="utf-8"?>
<androidx.constraintlayout.widget.ConstraintLayout xmlns:android="http://schemas.android.com/apk/res/android"
    android:layout_width="match_parent"
    android:layout_height="match_parent"
    android:orientation="vertical">

    <ImageView
        android:id="@+id/iv_background"
        android:layout_width="match_parent"
        android:layout_height="match_parent" />

    <com.android.cameraapp.UiUtil.AutoFitTextureView
        android:id="@+id/texture_back"
        android:layout_width="wrap_content"
        android:layout_height="wrap_content"
        tools:ignore="MissingConstraints" />

    <com.android.cameraapp.UiUtil.AutoFitTextureView
        android:id="@+id/texture_front"
        android:layout_width="wrap_content"
        android:layout_height="wrap_content"
        tools:ignore="MissingConstraints" />

</androidx.constraintlayout.widget.ConstraintLayout>
2.代码优化
如果看到这里,证明你已经跟随博文实现了前后双摄,回过头来看代码,会发现比较简单粗糙,就是博文开始时所述,将单个摄像头预览开启流程重复了一遍。
这样的代码不简洁也不美观,且不易于扩展,可以使用工厂模式将功能代码抽象成一个Camera2Proxy,这一过程就不在此复述了。
七.结束语
前后双摄的实现过程和关键代码讲解到此结束